Homebridge hub using a Raspberry Pi
I found out about Homebridge a few months ago and I was immediatly intrigued. Being able to integrate almost any device with Apple’s HomeKit sounded amazing.
I started testing it out on Windows 10 and it was quite easy to setup and use. Once I tested it for a few days I thought it was time to step it up and run in on my Pi.
My setup used the following plugins:
- homebridge-samsung-tizen: Lets you control your Samsung TVs
- homebridge-plex-v2: Manages your Plex players (you can also adjust your Hue lights while using Plex)
- homebridge-people: Monitors who is at home, based on their smartphone being seen on the network recently
- homebridge-automation-chromecast: Creates a switch linked with the status of a Chromecast or Chromecast Audio device
- homebridge-camera-ffmpeg: Lets you link your home cameras
- homebridge-hue: Exposes ZigBee devices (lights, plugs, sensors, switches, etc) connected to a Philips Hue bridge or a dresden elektronik deCONZ gateway
- homebridge-winpc: Remotely wake or turn off Windows PCs
After searching for the best ways to set Homebridge up automatically on Linux I stumbled upon this great GitHub repo. A Docker image running on Alpine Linux with Homebridge and Homebridge UI ready to go.
I adapted the startup script of the Docker image to install this plugins automatically but I found out that some of them required other components being installed on the host. This was necessary for homebridge-people and homebridge-camera-ffmpeg, they required the iputils and the ffmpeg packages respectibly so I added them to be installed on the startup script as well.
After that I, forked the original repo to add my changes so it would be easier to have everything setup, and I decided to make this guide so anyone could have their own Homebridge hub with some basic plugins. This guide is a combination of the wiki of the original repo with a few additions and clarifications that I found useful.
Requirements
- A Raspberry Pi 1 Model B or later
- An SD Card
Initial setup
- Get the latest copy of Raspbian Stretch Lite from the official website
- Install the system image on your SD Card
Raspbian headless boot
You can enable SSH and Wi-Fi (optional) services before we boot from the SD card for the first time. Once you burn the OS image to your SD card, access it from your computer. You should see it under the name “boot”. Create two files on the root of the SD card:
- The first file should have the name “ssh” and no content (just an empty file)
- The second file (optional) should be named “wpa_supplicant.conf” and contain the following:
country=YOUR\_COUNTRY\_CODE
ctrl\_interface=DIR=/var/run/wpa\_supplicant GROUP=netdev
update\_config=1

network={
    ssid="YOUR\_SSID"
    scan\_ssid=1
    psk="YOUR\_PASSWORD"
    key\_mgmt=WPA-PSK
}
Replace “YOUR_COUNTRY_CODE” with your two-letter country code.
Login
You can now boot your Raspberry Pi and connect using SSH.
You should be able to connect using raspberrypi.local as the hostname. If not then you’ll need to find out what IP address the Raspberry Pi was assigned and connect using that instead. If you need help finding your Pi’s IP address you can use this great tool made by Adafruit, it runs on Windows, Mac or Linux.
ssh pi@raspberrypi.local
The default username is pi and the password israspberry. You should change the default password now using the passwd command.
Installation
Run the quick install script:
curl https://raw.githubusercontent.com/gtfunes/docker-homebridge/master/raspbian-installer.sh -o get-homebridge.sh
chmod u+x get-homebridge.sh
./get-homebridge.sh
After installing everything, Docker will start Homebridge automatically and it will also run on boot.
Managing Homebridge
To manage Homebridge go to http://raspberrypi.local:8080 (or the IP address of your Pi) in your browser. From here you can manage your plugins, edit the main config.json file, view log files and restart the service.
The default username for the management console is admin and the password isadmin. You can change the default password later from the “User Accounts” menu.

Connecting with HomeKit
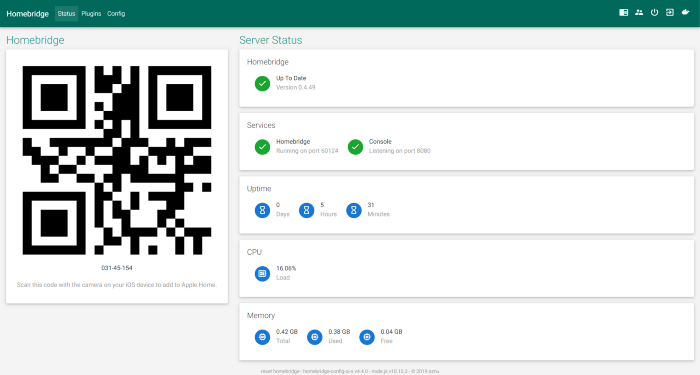
You should now be able to see your newly createdHomebridge as a HomeKit accessory in the Home app on your iOS device. Tap on the “+” button on the top right corner and select “Add Accessory”. You can pair the device using the QR code displayed in Homebridge UI or by selecting the “Don’t have a Code or Can’t Scan” option and using the default pairing pin: 031-45-154 (shown under the QR code).
Or you can just scan the QR code with the camera app on your iOS device and it will take you straight to the Home app. It just works™.
Once this is done you will see all your configured accessories inside the Home app.
Docker administration from the browser
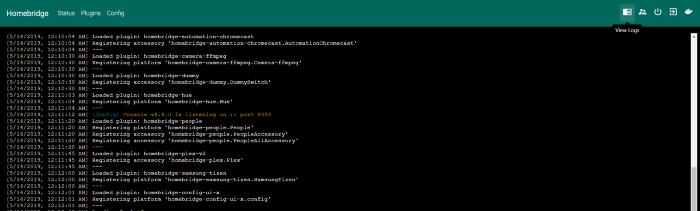
One of the great features of Homebridge UI is the ability to view Homebridge’s logs live, restarting the Docker container and editing the startup script from your browser.
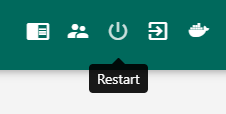
Tapping on the Docker icon on the top right corner of the screen shows more options:
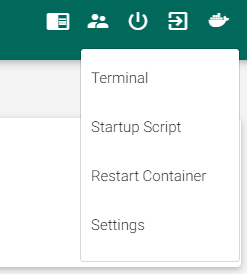
Homebridge UI offers everything you need to manage your Docker container without leaving your browser, this makes it really easy to edit any configurations. Just remember to restart the container after any changes.
Configuration
From the “Config” menu you can edit the config.json file directly to add or edit your Homebridge devices. You can check the links for every plugin’s NPM repository page on how to configure each of them.

Shell access
If you require direct shell access to the container without using Homebridge UI, you can do so by running the following command inside the “homebridge” folder:
docker-compose exec homebridge sh
Manual restart
You can restart the container from the command line at any time by running the following command inside the “homebridge” folder:
docker-compose restart homebridge
That’s it!
You now have a Homebridge hub running on your Pi that’s easy to manage and update.
You can check other useful plugins here and there’s also an IFTTT integration.
The great thing about running this inside a Docker container is that you could run it anywhere, on any OS and it will work the same way.
I love doing little projects like this one using a Raspberry Pi and I hope you enjoy your new smart home!
👋